Enjoy the Night in Banff: Go Stargazing (Complete Guide!)
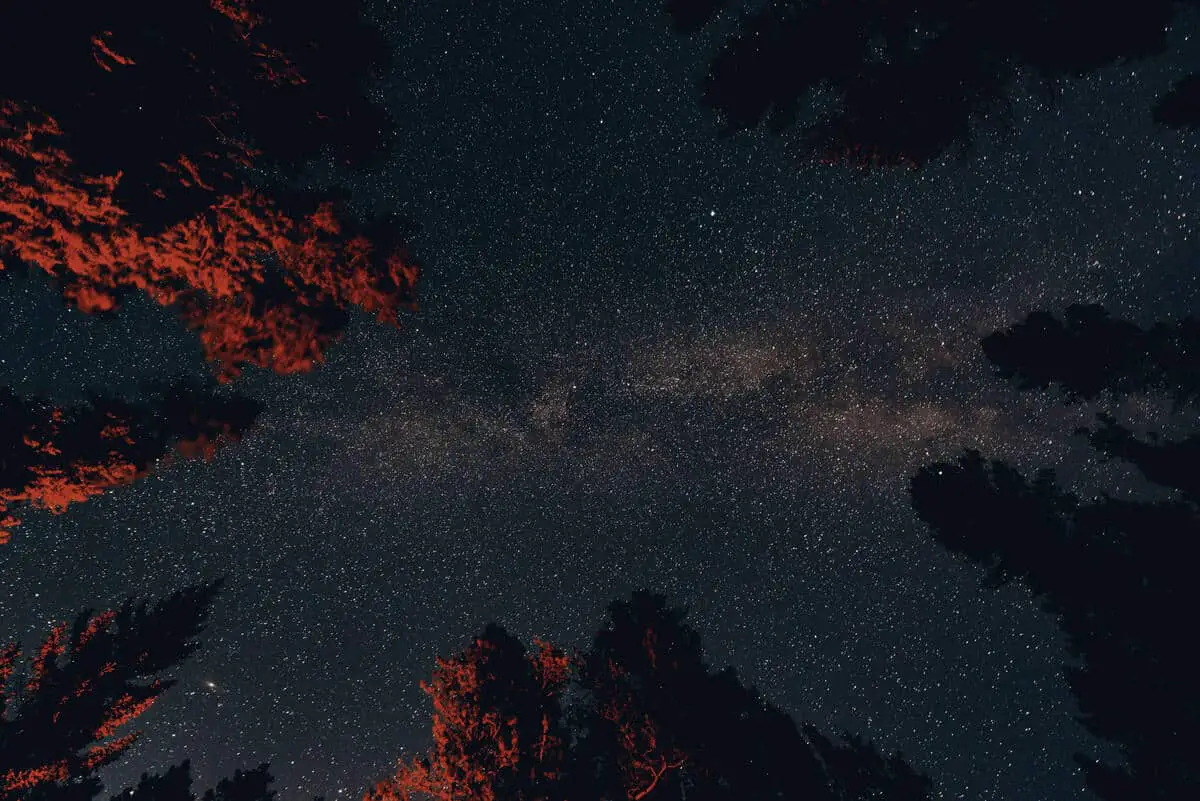
If you want to see Banff National Park in a completely different way, go stargazing. See how the light of the moon and the stars give the mountains, trees and rivers a subtle glow. And be sure to bring your camera.
The region of Banff and Lake Louise offers you the possibility to view the stars under one of the darkest skies on the planet. An excellent opportunity to spend an evening gazing upwards. And yes, you can do that without a telescope or other professional equipment. If you want to know how, read on.
Is Banff Dark Enough for Stargazing?
The answer to that question is a resounding ‘yes’. Although some places in Canada are even darker at night, the so-called Dark Sky Preserves. Still, the Banff night sky is great for walking around with your head in your neck
What is a Dark Sky Preserve?
Light pollution – artificial light shining into the night – causes disruption to a dark environment. This is taken into account when determining a Dark Sky Preserve.
A Dark Sky Preserve is a protected area where the protection and preservation of nighttime darkness are paramount. This is done by reducing or eliminating light pollution in all forms.
This protection serves an ecological function, as much wildlife depends on darkness to forage, breed and navigate.
Although stargazing is fine in Banff, the park does not qualify as a Dark Sky Reserve. Jasper National Park, which borders Banff, is. Another example is Wood Buffalo National Park in northern Alberta. In fact, this park is the largest Dark-Sky Preserve in the world, but not the darkest. You can find that one in Canada, too, in Saskatchewan, called Grasslands National Park, in the far south of the province.
What Are the Best Places in Banff to Stargaze?
You might expect that it doesn’t matter much where you want to view the night sky in the park, but there are locations where you can get a better view than in other places. This has to do with the lesser degree of light pollution in those locations. Try like Lake Minnewanka stargazing for instance. You won’t regret it. Here’s a list:
- Cascade Meadows (Located on the Lake Minnewanka loop near Lake Minnewanka)
- Castle Mountain Junction (The intersection on the Trans-Canada Highway off of Castle Mountain)
- Lake Louise
- Lake Minnewanka
- Morant’s Curve (location: 51.3996° N, 116.1287° W)
- Sulphur Mountain (go to the top and back to the valley with the Banff Gondola)
- Two Jack Lake (located on the south side of Lake Minnewanka)
- Vermilion Lakes (within walking distance of the Banff townsite)
- Icefields Parkway (Perhaps the darkest part of the park, Bow Lake is highly recommended)
What Are the Ideal Conditions for Stargazing?
The less moisture, dust or other particles there is in the air, the more transparent the sky. In other words, if the sky is foggy, your photos of the night sky will lack detail and color.
In addition you need a clear, dark sky without a trace of clouds, of course.
Can You See the Milky Way in Banff?
Yes, you can. One of the best locations to see the galaxy is Castle Mountain, about halfway between Banff and Lake Louise. The nearby Castle Mountain Lodge provides an excellent location to see this phenomenon. Another superb option is Two Jack Lake, near the Banff townsite. The shoreline is easily accessible on foot from the parking lot.
What Is the Best Time to Look at the Stars?
Although the night is often considered the best time for stargazing, the early morning hours can provide the ideal conditions. A clearly visible moon makes your stargazing Banff experience a lot less thrilling because the moonlight obscures the light of many stars or meteor showers.
The early morning hours are therefore often better suited because the influence of the moonlight has disappeared. It allows you to see stars and planets that you would otherwise not see. You also have a better view of the Milky Way (depending on the time of year).
Is it Better to Stargaze in Summer or in Winter?
Winter is the best time for stargazing. The sky’s transparency is usually better than in summer because the North Pole’s cold air sends cleaner air south. One advantage of stargazing in winter is that the places you visit are often deserted. How about Vermilion Lakes in the winter, for example? Chances are you’ll have one of the jetties in the water to yourself. And if you’re lucky, you can also see the northern lights there.
Stargazing Tips
Stargazing, how to do it? By looking up, of course, but it is helpful to know what to look for. Here are a few tips.
- Use binoculars. If you have binoculars with you on vacation, be sure to bring them along on your nighttime adventure. Point them at the moon and other bright objects in the night sky. Use your binoculars to view the Milky Way or star clusters. These are often hazy specks in the night sky. They can also be clouds of gas and dust where new stars are forming.
- Use a star chart. A star chart is the best way to learn about the night sky. They may be old-fashioned, but they are also beneficial. You can just download and print them. The map helps you recognize planets and patterns in the night sky.
- Install a good stargazing app on your phone. It’s a valuable tool, especially if you are a beginner and don’t know how to “read” the sky. Most apps allow you to set your location and see the positions of the planets, among other things. The app Sky Guide is a good option. It shows planets and stars simply by pointing your phone at the sky. The app also draws out the constellations for you.
- Watch for patterns between the stars. If you can recognize these patterns, you can identify constellations. Constellations have distinctive patterns and, in many cases, are relatively easy to recognize.
What Gear Do I Need to Go Stargazing?
You don’t really need to take anything with you to look at the stars. Your eyes are enough to see the night sky’s surprises. But for those who would like to see just a little more or better understand what they are looking at, it is helpful to bring some tools and other stuff.
1. Binoculars: binoculars are an essential part of stargazing for those who want to see more than can be seen with the naked eye. Binoculars help you find otherwise invisible reference stars.
Binoculars are, therefore, your best friend on your nighttime adventure. They allow you to see many more details of the night sky. Binoculars also will enable you to distinguish better and more colors. However, they will not allow you to observe a meteor shower. For that, you need the broadest possible view of the night sky. So it is better to watch them with the naked eye.
If you do not have binoculars and want to buy them, especially for stargazing, do not buy a large pair! They are heavy and the weight makes it hard to hold the binoculars steady. Larger binoculars are therefore better to put on a tripod.
7×50 binoculars (7x magnification, 50 mm diameter lenses) are optimal for beginners. They are small enough to hold firmly and magnify enough to have a good view of the night sky. And during the day they are of course also excellent for use in the park.
Check the current price for this pair of binoculars on Amazon.com.
2. Camera/phone: photograph your nighttime adventure for extraordinary pictures. It is not easy to take good photos in the dark. Read below how you, as an (amateur) photographer, can get maximum results with your camera and/or phone.
3. Tripod: it is helpful to bring a tripod to hold your camera and/or phone as still as possible while taking pictures. If you do not have one, you can check the current price on Amazon.com.
4. Beach towel: place a beach towel under your tripod legs. It is an excellent way to safely catch something if it falls.
5. White headlamp: when you’re done observing the night sky, a white headlamp can help you clean up quickly because you have your hands free. Check the current price on Amazon.com.
And no, you don’t need a telescope to become a stargazer. Binoculars are much easier to use. A telescope – when you are a beginner – would only distract you. You would soon be more concerned with (the operation of) the device than what you came for: stargazing.
6. Camping chairs: Make sure to pack a few camping chairs in your trunk so you can enjoy the starry night in a relaxing way.
How Do You Photograph the Night Sky?
As I stated above, it’s not easy to take good photos in the dark. To photograph the stars in the sky as points of light, start with a full aperture stop on your camera. This stop is a doubling of the light falling on the sensor of your camera or phone.
In addition, you do well using a shutter speed of about 20 seconds. The stars will become blurred if you use an even slower shutter speed. And increase the ISO – if necessary – for good exposure. Usually, you need an ISO of 1600 or higher for good results.
Timing and planning are essential in astrophotography. Explore your shooting location in advance. Consider placing interesting landscape features in the foreground. It is helpful to read about the night sky in advance to know what you photograph. There are – of course – useful apps for this, such as PhotoPills.
A higher place is usually best because you have less to do with particles in the air that scatter the light. This makes your photos brighter and more detailed. Another tip is to avoid light pollution, such as Banff and Lake Louise.
Furthermore, winter is also a better time for stargazing. You get ‘cleaner’ pictures at colder temperatures because your camera’s sensor increases less during long exposures. As a result, it produces less noise.
How Do You Photograph the Stars with a Cell Phone?
Capturing the night sky with your cell phone seems a bit far-fetched, but you can still take pictures of stars and planets. To do this, you need to increase the shutter speed to a minimum of eight seconds, just like with a regular camera.
If your phone allows for it, use an even longer shutter speed, as your camera captures more light with a longer shutter speed. Also, change the ISO value on your phone to at least 800. Experiment and see what gives you the best results. The ideal settings depend on your phone and the conditions.
Book a Banff Stargazing Tour
If you want to study the stars in pleasant company, you can book a stargazing tour. Tour operator Yervana offers these for Banff National Park. This tour is suitable for beginners, lasts 2 hours and the group size is a maximum of twelve people. The guide provides bear spray, a headlamp and a flashlight. The tour costs CAD 45. For more information, visit Yervana.com.
Looking for more Instagram material from Banff? Check the most beautiful locations during sunset or sunrise. Click the link to read the post.